一天在面试中,面试官给了我一道手写代码题
我当时的第一版思路,将两个参数数组进行拼接,通过闭包返回结果,面试官提示如果参数为空,怎么办,我增加了args = args || [];这一句
1 2 3 4 5 6 function partialUsingArguments (fn, ...args ) args = args || []; return function (..._args ) return fn(args.concat(_args)); } }
面试官说如果参数不是数组,是对象怎么办,提示ES6还有什么拼接方法,使用展开运算符
1 2 3 4 5 function partialUsingArguments (fn, args ) return function (_args ) return fn(...args, ..._args); } }
我当场问面试官,是不是函数柯里化,其实这和柯里化一样,叫作偏函数,和函数柯里化一样,都属于函数式编程的范畴,这里总结了一些函数式编程的经典案例,吃透它们吧。
推荐阅读:
1.什么是函数式编程 JavaScript 语言从一诞生,就具有函数式编程的烙印。它将函数作为一种独立的数据类型,与其他数据类型处于完全平等的地位。在 JavaScript 语言中,你可以采用面向对象编程,也可以采用函数式编程。有人甚至说,JavaScript 是有史以来第一种被大规模采用的函数式编程语言。 ES6 的种种新增功能,使得函数式编程变得更方便、更强大。
在文章之前,先和大家讲一下对于函数式编程(Functional Programming, aka. FP )的理解(下文使用FP指代函数式编程):
FP需要保证函数都是纯净的,既不依赖外部的状态变量,也不产生副作用。基于此前提下,那么纯函数的组合与调用,在时间顺序上就不会产生依赖,改变多个函数的调用顺序也不必担心产生问题,因此也会消灭许多潜在的bug。
函数必须有输入输出。如果一个函数缺乏输入或输出,那么它其实是一段处理程序procedure 而已。
函数尽可能的保持功能的单一,如果一个函数做了多件事情,那么它理论上应当被拆分为多个函数。
FP的意义之一就是,在适当的时机使用声明式编程,抽象了程序流的控制与表现,从理解和维护的角度上会胜于命令式编程。
FP是一种范式,但并不意味这和OOP(面向对象编程)冲突,两者当然是可以和谐共存的。个人认为 React 其实就是一个很好的栗子~
Javascript的函数一等公民以及闭包的特性,决定了Javascript的确是适合施展FP的舞台
2.闭包 闭包对于 Javascript 来说,当然十分重要。然而对于函数式编程来说,这更加是必不可少的,必须掌握的概念,闭包的定义如下:
Closure is when a function remembers and accesses variables from outside of its own scope, even when that function is executed in a different scope.
相信大部分同学都对闭包有不错的理解,但是由于对FP的学习十分重要。接下来我还是会啰嗦的带大家过一遍。闭包就是能够读取其他函数内部变量的函数
简单示例如下
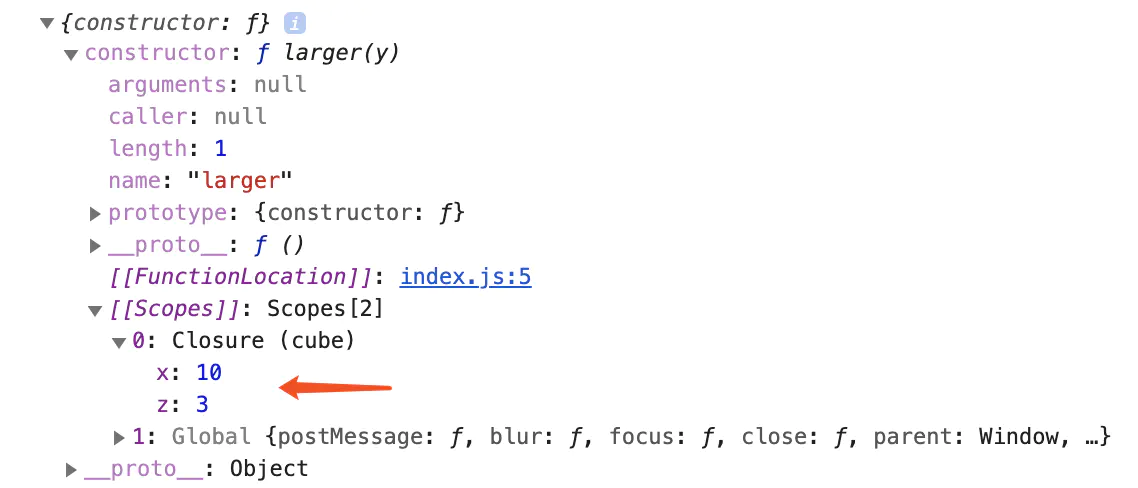
1 2 3 4 5 6 7 8 9 10 11 function cube (x ) let z = 1 ; return function larger (y ) return x * y * z++; }; } const makeCube = cube(10 );console .log(makeCube(5 )); console .log(makeCube(5 ));
那么有没有想过在函数makeCube,或者也可以说是函数larger是怎么记住原本不属于自己作用域的变量x和z的呢?在控制台查看makeCube.prototype,点开会发现原来是有个[[Scopes]]这个内置属性里的Closure(cube)记住了函数larger返回时记住的变量x和z。如果多嵌套几层函数,也会发现多几个Closure(name)在[[Scopes]]的Scopes[]数组里,按序查找变量。
再看下图测试代码:
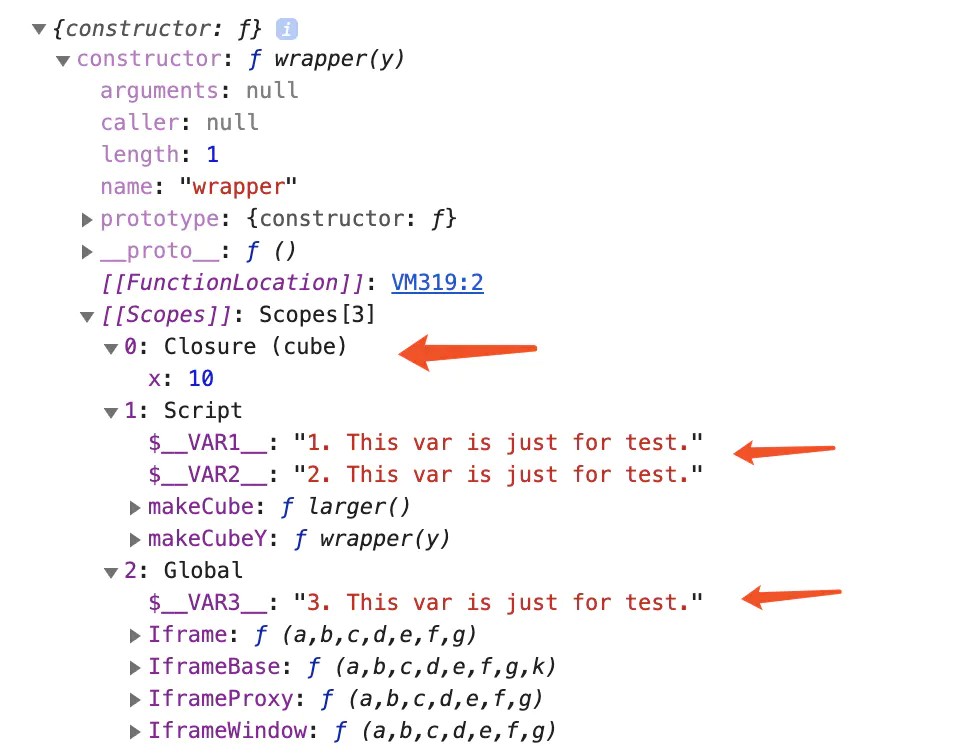
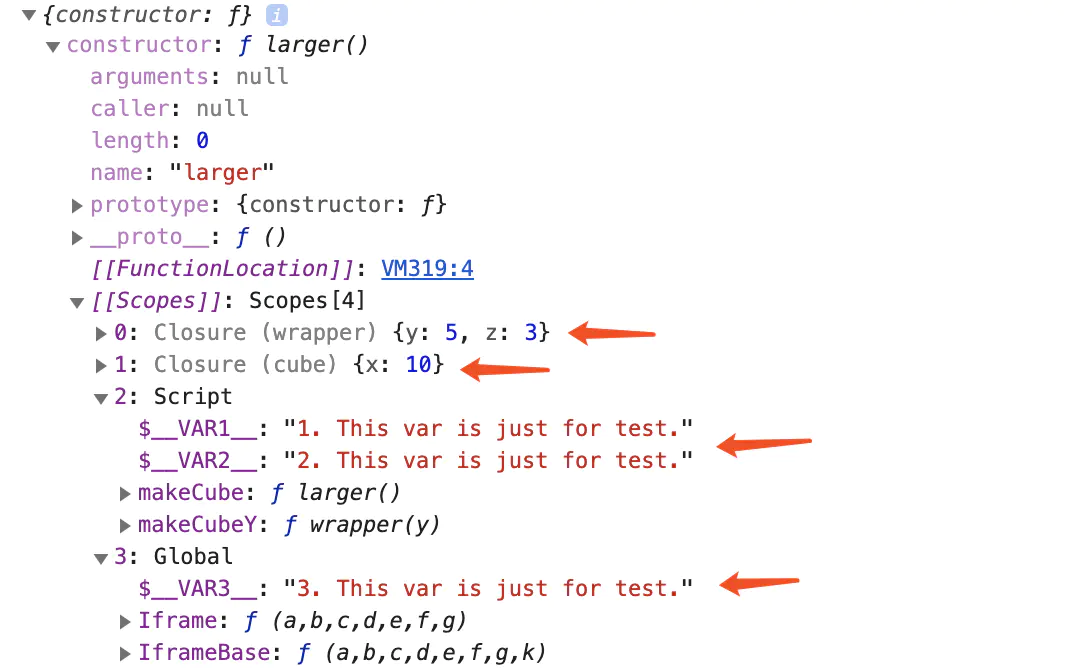
1 2 3 4 5 6 7 8 9 10 11 12 13 14 15 16 17 function cube (x ) return function wrapper (y ) let z = 1 ; return function larger ( return x * y * z++; }; } } const makeCubeY = cube(10 );const makeCube = makeCubeY(5 );const $__VAR1__ = '1. This var is just for test.' ;let $__VAR2__ = '2. This var is just for test.' ;var $__VAR3__ = '3. This var is just for test.' ;console .log(makeCubeY.prototype, makeCube.prototype);console .log(makeCube()); console .log(makeCube());
打印makeCubeY.prototype:
打印makeCube.prototype:
通过这几个实验可以从另一个角度去理解Javascript中闭包,一个闭包是怎么去查找不是自己作用域的变量呢?makeCube函数分别从[[Scopes]]中的Closure(wrapper)里找到变量y、z,Closure(cube)里找到变量x。至于全局let、const声明的变量放在了Script里,全局var声明的变量放在了Global里。
在学习FP前,理解闭包是尤为重要的~ 因为事实上大量的FP工具函数都使用了闭包这个特性。
3.unary ES6简化写法 1 const unary = fn =>arg =>
一元函数,应用于当只想在某个函数上传递一个参数 情况下使用。尝试考虑以下场景:
1 2 console .log(['1' , '2' , '3' ].map(parseInt )); console .log(['1' , '2' , '3' ].map(unary(parseInt )));
parseInt(string, radix)接收两个参数,而map函数中接收的回调函数callback(currentValue[, index[, array]]),第二个参数是index,此时如果parseInt的使用就是错误的,[‘1’, ‘2’, ‘3’].map(parseInt)会计算parseInt(1, 0), parseInt(2, 1)和parseInt(3, 2)的值。当然除了Array.prototype.map,大量内置的数组方法中的回调函数中都不止传递一个参数,如果存在适用的只需要第一个参数的场景,unary函数就发挥了它的价值,无需修改函数,优雅简洁地就接入了。对于unary函数,fn就是闭包记忆的变量数据,可以将函数展开为
ES6常规写法 1 2 3 4 5 const unary = function (fn ) return function (arg ) return fn(arg); } }
4.identity ES6简化写法 1 const identity = v =>
将函数展开为
ES6常规写法 1 2 3 const identity = function (v ) return v; }
有同学会看到identity函数会觉得莫名其妙?是干嘛的?我第一眼看到也很迷惑?但是考虑以下场景:
1 2 3 console .log([false , 1 , 2 , 0 , '5' , true ].filter( identity )); console .log([false , 0 ].some( identity )); console .log([-2 , 1 , '3' ].every( identity ));
怎么样?眼前一亮吧,没想到identity函数原来深藏不露,事实上虽然identity返回了原值,但是在这些函数中Javascript会对返回的值进行类型装换,变成了布尔值。比如filter函数。我们可以看MDN定义filter描述如下(看标粗的那一句)。
filter() calls a provided callback function once for each element in an array, and constructs a new array of all the values for which callback returns a value that coerces to true.
5.constant ES6简化写法 1 const constant = v =>() => v;
将函数展开为
ES6常规写法 1 2 3 4 5 const constant = function (v ) return function ( return v; } }
同样,这个函数…乍一看,也不知道具体有什么用。但是考虑场景如下:
1 2 3 4 5 6 const p1 = new Promise ((resolve, reject ) => { setTimeout (() => { resolve('Hello!' ); }, 200 ); }); p1.then(constant('Hi' )).then(console .log);
引入constant函数简化函数
1 2 3 4 5 6 7 const p1 = new Promise ((resolve, reject ) => { setTimeout (() => { resolve('Hello!' ); }, 200 ); }); const constant = v =>() => v;p1.then(constant('Hi' )).then(console .log);
而直接传参数会出现Promise中的值穿透
1 2 3 4 5 6 const p1 = new Promise ((resolve, reject ) => { setTimeout (() => { resolve('Hello!' ); }, 200 ); }); p1.then('Hi' ).then(console .log);
由于Promise.prototype.then只接受函数,如果我仅仅只需要传递一个值时,那么constant便会提供这种便利。当然这个并没有什么功能上的提升,但是的确提高了可阅读性,也是函数式编程的一个优点。
6.spreadArgs & gatherArgs ES6简化写法 1 2 const spreadArgs = fn =>argsArr =>const gatherArgs = fn =>(...argsArr ) => fn(argsArr);
将函数展开为
ES6常规写法 1 2 3 4 5 6 7 8 9 10 const spreadArgs = function (fn ) return function (argsArr ) return fn(...argsArr); } } const gatherArgs = function (fn ) return function (...argsArr ) return fn(argsArr); } }
嗯这两个函数见名知义。spreadArgs函数用于展开一个函数的所有参数,gatherArgs函数收集一个函数的所有参数,这两个函数明显对立,那么它们的应用场景又是什么呢?
spreadArgs函数示例如下:
1 2 3 4 5 6 7 8 9 10 11 function cube (x, y, z ) return x * y * z; } function make (fn, points ) return fn(points); } const spreadArgs = fn =>argsArr =>console .log(make(cube, [3 , 4 , 5 ])); console .log(make(spreadArgs(cube), [3 , 4 , 5 ]));
gatherArgs函数示例如下:
1 2 3 4 5 6 7 function combineFirstTwo ([v1, v2] ) return v1 + v2; } const gatherArgs = fn =>(...argsArr ) => fn(argsArr);console .log([1 , 2 , 3 , 4 , 5 ].reduce(gatherArgs(combineFirstTwo)));
看完以上代码,简单的两个工具函数,轻易的做到了对一个函数的转换,从而使其适用于另一个场景。如果从此应该可以瞥见函数式编程的一点点魅力,那么下面的两个函数将给大家带来更多的惊喜。
7.partial & curry(偏函数与柯里化) 相信大家对函数柯里化应该或多或少有点了解。维基百科定义:
在计算机科学中,柯里化(英语:Currying),又译为卡瑞化或加里化,是把接受多个参数的函数变换成接受一个单一参数(最初函数的第一个参数)的函数,并且返回接受余下的参数而且返回结果的新函数的技术。
当然得益于闭包的强大威力,柯里化这个武器得以诞生于Javascript世界。
我面试的那个问题本质上就是partial偏函数,和柯里化有点类似,所以没见过的我当场做完之后问了一下是不是函数的柯里化,想想也知道不是,知识两者类似
偏函数ES6简化写法 1 2 const partial = (fn, ...args ) => (..._args ) => fn(...args, ..._args);
把我的手写版本改成相同的格式,作为其展开版本,
偏函数ES6常规写法 1 2 3 4 5 function partial (fn, ...args ) return function (..._args ) return fn(...args, ..._args); } }
函数柯里化也同样利用用闭包把参数保存起来,当参数的数量足够执行函数了,就开始执行函数。
函数柯里化ES6常规写法 1 2 3 4 5 6 7 8 9 10 11 12 13 14 15 16 17 18 19 20 21 function curry (fn, ...args ) const len = fn.length; if (args.length >= len) { return fn(...args); } else return function (..._args ) return curry.call(this , fn, ...args, ..._args); } } function multiFn (a, b, c ) return a * b * c; } var multi = curry(multiFn);console .log(multi(2 )(3 )(4 )); console .log(multi(3 , 4 , 5 )); console .log(multi(4 )(5 , 6 )); console .log(multi(5 , 6 )(7 ));
经过一些简化的方法
1 2 3 4 5 6 7 8 9 10 11 12 13 14 15 16 17 18 19 20 function curry (fn, ...args ) if (args.length >= fn.length) { return fn(...args); } else { return (..._args ) => curry(fn, ...args, ..._args); } } function multiFn (a, b, c ) return a * b * c; } var multi = curry(multiFn);console .log(multi(2 )(3 )(4 )); console .log(multi(3 , 4 , 5 )); console .log(multi(4 )(5 , 6 )); console .log(multi(5 , 6 )(7 ));
函数柯里化ES6简化写法 1 2 3 4 5 6 7 8 9 10 11 12 13 14 const curry = (fn, arr = [] ) => (..._args ) => ( args => args.length === fn.length ? fn(...args) : curry(fn, args) )([...arr, ..._args]) function multiFn (a, b, c ) return a * b * c; } var multi = curry(multiFn);console .log(multi(2 )(3 )(4 )); console .log(multi(3 , 4 , 5 )); console .log(multi(4 )(5 , 6 )); console .log(multi(5 , 6 )(7 ));
请大家先精读以上关于partial、curry函数的代码。
先模拟一个ajax函数如下:
1 2 3 4 5 6 7 function ajax (url, params, callback ) setTimeout (() => { callback( `GET ${url} \nparams: ${params} \ndata: Hello! ${params} ` ); }); }
考虑partial使用场景如下:
1 2 3 4 5 6 7 8 9 10 11 12 13 14 15 16 17 18 19 20 21 22 function ajax (url, params, callback ) setTimeout (() => { callback( `GET ${url} \nparams: ${params} \ndata: Hello! ${params} ` ); }); } function partial (fn, ...args ) return function (..._args ) return fn(...args, ..._args); } } const fetchPerson = partial( ajax, "http://some.api/person" );fetchPerson('Teddy Bear' , console .log);
考虑curry使用场景如下:
1 2 3 4 5 6 7 8 9 10 11 12 13 14 15 16 17 18 19 20 21 22 23 24 25 26 27 function ajax (url, params, callback ) setTimeout (() => { callback( `GET ${url} \nparams: ${params} \ndata: Hello! ${params} ` ); }); } function curry (fn, ...args ) if (args.length >= fn.length) { return fn(...args); } else { return (..._args ) => curry(fn, ...args, ..._args); } } const fetchPerson = curry(ajax)('http://some.api/person' );const fetchUncleBarney = fetchPerson('Uncle Barney' );fetchUncleBarney(console .log);
partial和curry函数功能相似,但又有具体的不同应用场景,但总体来说curry会比partial更自动化一点。
但是!相信看完示例的同学又会有一连串问号?为什么好好地参数不一次性传入,而非要分开多次传入这么麻烦?原因如下:
最首要的原因是partial和curry函数都允许我们通过参数控制将一个函数的调用在时间和空间上分开了。传统函数需要一次性将参数凑齐才能调用,但是有时候我们可以提前预置部分参数,在最终需要触发此函数时,才将剩余参数传入。这时候partial和curry就会变得十分有用。
partial和curry的存在让函数组合(compose )会更加便利。
当然最重要是也提升了可阅读性!一开始可能不这么以为,但是如果你实践操作感受之后,也许会改观。
P.S. 关于函数式编程的实践,大家可以使用lodash/fp模块进行入门实践。
8.compose(函数合成) 函数合成(function composition)指的是,将多个函数合成一个函数。
如果我们想,对一个值执行一系列操作,并打印出来,考虑以下代码:
1 2 3 4 5 6 7 8 9 10 11 12 13 14 15 16 17 18 19 20 21 22 23 const partial = (fn, ...args ) => (..._args ) => fn(...args, ..._args); const partialRight = (fn, ...args ) => (..._args ) => fn(..._args, ...args); function add (x, y ) return x + y; } function pow (x, y ) return Math .pow(x, y); } function double (x ) return x * 2 ; } const add10 = partial(add, 10 );const pow3 = partialRight(pow, 3 );console .log(add10(pow3(double(2 ))));
上面代码中,compose就是一个函数合成器,用于将两个函数合成一个函数。
备注:partialRight和partial见名知意,相当于是彼此的镜像函数。
_.partialRight: This method is like _.partial except that partially applied arguments are appended to the arguments it receives.
原文从lodash导入,我自己仿照partial重写了一版。无需否认,这段示例代码的确毫无意义。但是为了达成这一系列操作,我最终执行了这一长串嵌套了四层的函数调用:console.log(add10(pow3(double(2))))。(说实话,我的确觉得有点难以阅读了…),如果更长了,怎么办?可能有的同学会给出以下答案:
1 2 3 4 5 6 7 8 9 10 11 12 13 14 15 16 17 18 19 20 21 22 23 24 25 26 27 function mixed (x ) return add10(pow3(double(2 ))); } const partial = (fn, ...args ) => (..._args ) => fn(...args, ..._args); const partialRight = (fn, ...args ) => (..._args ) => fn(..._args, ...args); function add (x, y ) return x + y; } function pow (x, y ) return Math .pow(x, y); } function double (x ) return x * 2 ; } const add10 = partial(add, 10 );const pow3 = partialRight(pow, 3 );console .log(mixed(2 ));
的确,看似好了点,但是也只是将这个冗长的调用封装了一下而已。会不会有更好的做法?
基于栈的compose函数 1 2 3 4 5 6 7 8 9 10 11 12 13 14 15 16 17 18 19 20 21 22 23 24 25 26 27 28 29 30 31 32 function compose (...args ) return function (result ) const funcs = [...args]; while (funcs.length > 0 ) { result = funcs.pop()(result); } return result; }; } const partial = (fn, ...args ) => (..._args ) => fn(...args, ..._args); const partialRight = (fn, ...args ) => (..._args ) => fn(..._args, ...args); function add (x, y ) return x + y; } function pow (x, y ) return Math .pow(x, y); } function double (x ) return x * 2 ; } const add10 = partial(add, 10 );const pow3 = partialRight(pow, 3 );compose(console .log, add10, pow3, double)(2 )
欧耶!我们通过实现了一个简单的compose函数,然后发现调用的过程compose(console.log, add10, pow3, double)(2)竟然变得如此优雅!多个函数的调用从代码阅读上,多层嵌套被拍平变成了线性!(当然实际上本质上还是嵌套的函数调用的)。
使用函数reduce的compose函数 当然,关于compose的更加函数式的实现如下:
1 2 3 4 5 6 7 8 9 10 11 12 13 14 15 16 17 18 19 20 21 22 23 24 25 26 27 28 function compose (...funcs ) return result => .reverse() .reduce((result, fn ) => fn(result), result); } const partial = (fn, ...args ) => (..._args ) => fn(...args, ..._args); const partialRight = (fn, ...args ) => (..._args ) => fn(..._args, ...args); function add (x, y ) return x + y; } function pow (x, y ) return Math .pow(x, y); } function double (x ) return x * 2 ; } const add10 = partial(add, 10 );const pow3 = partialRight(pow, 3 );compose(console .log, add10, pow3, double)(2 )
那么有同学可能也发现了,上述compose之后的函数是只可以传递一个参数的。这无疑显得有点蠢?难道不可以优化实现支持多个参数么?
考虑以下代码:
1 2 3 4 5 6 7 8 9 10 11 12 13 14 15 16 17 18 19 20 21 22 23 24 25 26 27 28 29 30 31 32 33 function compose (...funcs ) return funcs .reduce((fn1, fn2 ) => (...args ) => fn1(fn2(...args))); } const partial = (fn, ...args ) => (..._args ) => fn(...args, ..._args); const partialRight = (fn, ...args ) => (..._args ) => fn(..._args, ...args); function add (x, y ) return x + y; } function pow (x, y ) return Math .pow(x, y); } function double (x ) return x * 2 ; } const add10 = partial(add, 10 );const pow3 = partialRight(pow, 3 );compose(console .log, add10, pow3, double)(2 )
细心观察,通过将参数传递进行懒执行,从而巧妙的完成了这个任务!示例如下:
1 2 3 4 5 6 7 8 9 10 11 12 13 14 15 16 17 18 19 20 21 22 23 24 25 26 27 28 29 30 31 32 33 34 function compose (...funcs ) return funcs .reduce((fn1, fn2 ) => (...args ) => fn1(fn2(...args))); } const partial = (fn, ...args ) => (..._args ) => fn(...args, ..._args); const partialRight = (fn, ...args ) => (..._args ) => fn(..._args, ...args); function add (x, y ) return x + y; } function pow (x, y ) return Math .pow(x, y); } function double (x ) return x * 2 ; } const add10 = partial(add, 10 );const pow3 = partialRight(pow, 3 );function multiply (x, y ) return x * y; } compose( console .log, add10, pow3, multiply )(2 , 5 );
当然上述代码最终也可以这么写:
1 2 3 4 5 6 7 8 9 10 11 12 13 14 15 16 17 18 19 20 21 22 23 24 25 26 27 28 29 30 31 32 33 34 function compose (...funcs ) return funcs .reduce((fn1, fn2 ) => (...args ) => fn1(fn2(...args))); } const partial = (fn, ...args ) => (..._args ) => fn(...args, ..._args); const partialRight = (fn, ...args ) => (..._args ) => fn(..._args, ...args); function add (x, y ) return x + y; } function pow (x, y ) return Math .pow(x, y); } function double (x ) return x * 2 ; } function multiply (x, y ) return x * y; } compose( console .log, partial(add, 10 ), partialRight(pow, 3 ), partial(multiply, 5 ) )(2 );
使用递归来实现compose 递归版本的compose本质上更接近概念,但是可能也会让人难以理解。了解一下也不错~
代码如下:
1 2 3 4 5 6 7 8 9 10 11 12 13 14 15 16 17 18 19 20 21 22 23 24 25 26 27 28 29 30 31 32 33 34 35 36 37 38 39 40 41 42 43 44 function compose (...funcs ) const [fn1, fn2, ...rest] = funcs.reverse(); function composed (...args ) return fn2(fn1(...args)); }; if (rest.length === 0 ) return composed; return compose( ...rest.reverse(), composed ); } const partial = (fn, ...args ) => (..._args ) => fn(...args, ..._args); const partialRight = (fn, ...args ) => (..._args ) => fn(..._args, ...args); function add (x, y ) return x + y; } function pow (x, y ) return Math .pow(x, y); } function double (x ) return x * 2 ; } const add10 = partial(add, 10 );const pow3 = partialRight(pow, 3 );function multiply (x, y ) return x * y; } compose( console .log, add10, pow3, multiply )(2 , 5 );
redux & koa-compose redux以及koa其实都是有中间件的思想,组合中间件的compose原理和上述代码也相差不远。大家可以稍微阅读以下两个链接的源码,代码都很简短,但都验证了compose的概念只要在实际开发中运用得当的话,可以发挥强大的魔力!
9.pipe(管道/序列) 那么学习完了compose,pipe又是什么呢?首先在刚刚学习compose函数时,可能有同学会觉得有点小别扭,因为compose从左到右传递参数的顺序刚好和调用顺序相反的!
(当然如果说帮助理解记忆的话,compose传参的顺序就是我们书写函数嵌套的顺序,在脑海里把console.log(add10(pow3(double(2))))这一长串里的括号去了,是不是就是参数的顺序了~)
回到话题,pipe是什么?同学们有没有使用过命令行,比如我常用的一个命令,将当前工作路径拷贝到剪切板,随时ctrl + v就可以使用了~
当然我木有走题!注意以上的管道符 |,这个其实就是pipe,可以将数据流从左到右传递。
基于队列的pipe函数 考虑的pipe示例代码如下:
1 2 3 4 5 6 7 8 9 10 11 12 13 14 15 16 17 18 19 20 21 22 23 24 25 26 27 28 29 30 31 32 33 34 35 36 37 38 function pipe (...args ) return result => const funcs = [...args]; while (funcs.length > 0 ) { result = funcs.shift()(result); } return result; }; } const partial = (fn, ...args ) => (..._args ) => fn(...args, ..._args); const partialRight = (fn, ...args ) => (..._args ) => fn(..._args, ...args); function add (x, y ) return x + y; } function pow (x, y ) return Math .pow(x, y); } function double (x ) return x * 2 ; } function multiply (x, y ) return x * y; } pipe( partial(multiply, 5 ), partialRight(pow, 3 ), partial(add, 10 ), console .log )(2 );
等等,从左到右?好像和compose刚好相反诶!而且这段代码好眼熟啊!将pop方法换成了shift方法而已!
那么实际上等价于:
1 2 const reverseArgs = func =>(...args ) => func(...args.reverse());const pipe = reverseArgs(compose);
哈我们避免了重复无意义的代码!当然无论是compose还是pipe,本质上我们都将命令式的代码转换成了声明式的代码,对一个值的操作可以理解为值在函数之间流动
1 2 --> multiply --> pow --> add --> console .log
多么优雅呀~
使用函数reduce的pipe函数 也可以实现关于pipe的更加函数式的实现如下:
1 2 3 4 5 6 7 8 9 10 11 12 13 14 15 16 17 18 19 20 21 22 23 24 25 26 27 28 29 30 31 32 33 34 function pipe (...funcs ) return result => .reduce((result, fn ) => fn(result), result); } const partial = (fn, ...args ) => (..._args ) => fn(...args, ..._args); const partialRight = (fn, ...args ) => (..._args ) => fn(..._args, ...args); function add (x, y ) return x + y; } function pow (x, y ) return Math .pow(x, y); } function double (x ) return x * 2 ; } function multiply (x, y ) return x * y; } pipe( partial(multiply, 5 ), partialRight(pow, 3 ), partial(add, 10 ), console .log )(2 );
上述pipe之后的函数是只可以传递一个参数的。优化实现支持多个参数么
考虑以下代码:
1 2 3 4 5 6 7 8 9 10 11 12 13 14 15 16 17 18 19 20 21 22 23 24 25 26 27 28 29 30 31 32 33 34 function pipe (...funcs ) return funcs .reduce((fn1, fn2 ) => (...args ) => fn2(fn1(...args))); } const partial = (fn, ...args ) => (..._args ) => fn(...args, ..._args); const partialRight = (fn, ...args ) => (..._args ) => fn(..._args, ...args); function add (x, y ) return x + y; } function pow (x, y ) return Math .pow(x, y); } function double (x ) return x * 2 ; } function multiply (x, y ) return x * y; } pipe( partial(multiply, 5 ), partialRight(pow, 3 ), partial(add, 10 ), console .log )(2 );
使用递归来实现pipe 递归版本的pipe本质上更接近概念,但是可能也会让人难以理解。
代码如下:
1 2 3 4 5 6 7 8 9 10 11 12 13 14 15 16 17 18 19 20 21 22 23 24 25 26 27 28 29 30 31 32 33 34 35 36 37 38 39 40 41 42 43 44 function pipe (...funcs ) const [fn1, fn2, ...rest] = funcs; function piped (...args ) return fn2(fn1(...args)); }; if (rest.length === 0 ) return piped; return pipe( ...rest, piped ); } const partial = (fn, ...args ) => (..._args ) => fn(...args, ..._args); const partialRight = (fn, ...args ) => (..._args ) => fn(..._args, ...args); function add (x, y ) return x + y; } function pow (x, y ) return Math .pow(x, y); } function double (x ) return x * 2 ; } function multiply (x, y ) return x * y; } pipe( partial(multiply, 5 ), partialRight(pow, 3 ), partial(add, 10 ), console .log )(2 );
10.Functor(函子) 前言 什么是函子? 定义 :函子是一个普通对象(在其它语言中,可能是一个类),它实现了map函数,在遍历每个对象值的时候生成一个新对象。
10.1 实现一个函子 简言之,函子是一个持有值的容器。而且函子是一个普通对象。我们就可以创建一个容器(也就是对象),让它能够持有任何传给它的值。
1 2 3 4 5 6 const Container = function (value ) this .value = value; } let testValue = new Container(1 );
我们给 Container 增加一个静态方法,它可以为我们在创建新的 Containers 时省略 new 关键字。
1 2 3 4 5 6 7 Container.of = function (value ) return new Container(value); } Container.of(1 );
函子需要实现 map 方法,具体的实现是,map 函数从 Container 中取出值,传入的函数把取出的值作为参数调用,并将结果放回 Container。
为什么需要 map 函数,我们上面实现的 Container 仅仅是持有了传给它的值。但是持有值的行为几乎没有任何应用场景,而 map 函数发挥的作用就是,允许我们使用当前 Container 持有的值调用任何函数。
1 2 3 4 5 6 7 8 Container.prototype.map = function (fn ) return Container.of(fn(this .value)); } let double = (x ) => x + x;Container.of(3 ).map(double);
map返回了一传入函数的执行结果为值的 Container 实例,所以我们可以链式操作。
1 2 Container.of(3 ).map(double).map(double).map(double);
完整版代码
1 2 3 4 5 6 7 8 9 10 11 12 13 14 15 16 17 const Container = function (value ) this .value = value; } Container.of = function (value ) return new Container(value); } Container.prototype.map = function (fn ) return Container.of(fn(this .value)); } let double = (x ) => x + x;Container.of(3 ).map(double).map(double).map(double);
使用ES6写法
1 2 3 4 5 6 7 8 9 10 11 12 13 14 15 16 17 18 19 class Container constructor (value ) this .value = value; } static of (value ) return new Container(value); } map (fn ) return Container.of(fn(this .value)); } } let double = (x ) => x + x;Container.of(3 ).map(double).map(double).map(double);
通过以上的实现,我们可以发现,函子就是一个实现了map契约的对象。函子是一个寻求契约的概念,该契约很简单,就是实现 map 。根据实现 map 函数的方式不同,会产生不同类型的函子,如 MayBe 、 Either
函子可以用来做什么?之前我们用tap函数来函数式的解决代码报错的调试问题,如何更加函数式的处理代码中的问题,那就需要用到下面我们说的MayBe函子
10.2 MayBe 函子 让我们先写一个upperCase函数来假设一种场景
1 2 3 4 5 6 7 8 let value = 'string' ;function upperCase (value ) if (value != null || value != undefined ) return value.toUpperCase(); } upperCase(value);
如上面所示,我们代码中经常需要判断一些null和undefined的情况。下面我们来看一下MayBe函子的实现。
1 2 3 4 5 6 7 8 9 10 11 12 13 14 15 16 17 18 19 20 21 22 23 24 25 26 27 const MayBe = function (value ) this .value = value; } MayBe.of = function (value ) return new MayBe(value); } MayBe.prototype.isNoting = function ( return this .value === null || this .value === undefined ; } MayBe.prototype.map = function (fn ) return this .isNoting() ? MayBe.of(null ) : MayBe.of(fn(this .value)); } let value = 'string' ;function upperCase (value ) return value.toUpperCase(); } MayBe.of(value).map(upperCase); let nullValue = null ;MayBe.of(nullValue).map(upperCase);
写成ES6形式
1 2 3 4 5 6 7 8 9 10 11 12 13 14 15 16 17 18 19 20 21 22 23 24 25 26 27 28 29 30 class MayBe constructor (value ) this .value = value; } static of (value ) return new MayBe(value); } isNoting ( return this .value === null || this .value === undefined ; } map (fn ) return this .isNoting() ? MayBe.of(null ) : MayBe.of(fn(this .value)); } } let value = 'string' ;function upperCase (value ) return value.toUpperCase(); } MayBe.of(value).map(upperCase); let nullValue = null ;MayBe.of(nullValue).map(upperCase);
10.3 Either 函子 1 2 3 MayBe.of("tony" ) .map(() => undefined ) .map((x)f => "Mr. " + x);
上面的代码结果是 MyaBe {value: null},这只是一个简单的例子,我们可以想一下,如果代码比较复杂,我们是不知道到底是哪一个分支在检查 undefined 和 null 值时执行失败了。这时候我们就需要 Either 函子了,它能解决分支拓展问题。
1 2 3 4 5 6 7 8 9 10 11 12 13 14 15 16 17 18 19 20 21 22 23 24 25 26 27 28 29 30 31 32 33 34 35 36 37 38 39 40 41 42 43 44 45 46 47 const Nothing = function (value ) this .value = value; } Nothing.of = function (value ) return new Nothing(value); } Nothing.prototype.map = function (fn ) return this ; } const Some = function (value ) this .value = value; } Some.of = function (value ) return new Some(value); } Some.prototype.map = function (fn ) return Some.of(fn(this .value)); } const Either = { Some, Nothing } function parseJSON (str ) try { return Either.Some.of(JSON .parse(str)); }catch (e) { return Either.Nothing.of({ error : e.message }) } } let eS = parseJSON('{name:xm}' );console .log(eS);let eN = parseJSON('{"name":"xm"}' )console .log(eN);console .log(eN.map(x =>
ES6代码
1 2 3 4 5 6 7 8 9 10 11 12 13 14 15 16 17 18 19 20 21 22 23 24 25 26 27 28 29 30 31 32 33 34 35 36 37 38 39 40 41 42 43 44 45 46 47 48 49 50 51 52 class Nothing constructor (value ) this .value = value; } static of (value ) return new Nothing(value); } map (fn ) return this ; } } class Some constructor (value ) this .value = value; } static of (value ) return new Some(value); } map (fn ) return Some.of(fn(this .value)); } } const Either = { Some, Nothing } function parseJSON (str ) try { return Either.Some.of(JSON .parse(str)); } catch (e) { return Either.Nothing.of({ error : e.message }) } } let eS = parseJSON('{name:xm}' );console .log(eS);let eN = parseJSON('{"name":"xm"}' )console .log(eN);console .log(eN.map(x =>
10.4 Pointed 函子 函子只是一个实现了 map 契约的接口。Pointed 函子也是一个函子的子集,它具有实现了 of 契约的接口。 我们在 MayBe 和 Either 中也实现了 of 方法,用来在创建 Container 时不使用 new 关键字。所以 MayBe 和 Either 都可称为 Pointed 函子。
Pointed 函子是实现了 of 静态方法的函子
of 方法是为了避免使用 new 来创建对象,更深层的含义是of 方法用来把值放到上下文
Context(把值放到容器中,使用 map 来处理值)
1 2 3 4 5 6 7 8 9 10 11 12 class Container static of (value) { return new Container(value); } …… } Contanier.of(2 ) .map(x =>5 );
ES6 增加了 Array.of, 这使得数组成为了一个 Pointed 函子。
**Array.of()** 方法创建一个具有可变数量参数的新数组实例,而不考虑参数的数量或类型。
**Array.of()** 和 **Array** 构造函数之间的区别在于处理整数参数:**Array.of(7)** 创建一个具有单个元素 7 的数组,而 Array(7)注意: 这是指一个有7个空位(empty)的数组,而不是由7个undefined组成的数组)。
1 2 3 4 5 Array .of(7 ); Array .of(1 , 2 , 3 ); Array (7 ); Array (1 , 2 , 3 );
语法
1 Array .of(element0[, element1[, ...[, elementN]]])
参数
elementN
任意个参数,将按顺序成为返回数组中的元素。
返回值
新的 Array
示例
1 2 3 Array .of(1 ); Array .of(1 , 2 , 3 ); Array .of(undefined );
10.5 Monad 函子(单子) MayBe 函子很可能会出现嵌套,如果出现嵌套后,我们想要继续操作真正的value是有困难的。必须深入到 MayBe 内部进行操作。
1 2 3 4 5 6 7 8 let joinExample = MayBe.of(MayBe.of(5 ));joinExample.map((insideMayBe ) => { return insideMayBe.map((value ) => value + 4 ); })
我们这时就可以实现一个 join 方法来解决这个问题。
1 2 3 4 5 6 7 8 9 10 11 MayBe.prototype.join = function ( return this .isNoting() ? MayBe.of(null ) : this .value; } let joinExample2 = MayBe.of(MayBe.of(5 ));joinExample2.join().map((value ) => value + 4 );
再延伸一下,我们扩展一个 chain 方法。
1 2 3 MayBe.prototype.chain = function (fn ) return this .map(fn).join(); }
调用 chain 后就能把嵌套的 MayBe 展开了。
完整代码
1 2 3 4 5 6 7 8 9 10 11 12 13 14 15 16 17 18 19 20 21 22 23 24 25 26 27 28 29 30 31 32 33 const MayBe = function (value ) this .value = value; } MayBe.of = function (value ) return new MayBe(value); } MayBe.prototype.isNoting = function ( return this .value === null || this .value === undefined ; } MayBe.prototype.join = function ( return this .isNoting() ? MayBe.of(null ) : this .value; } MayBe.prototype.map = function (fn ) return this .isNoting() ? MayBe.of(null ) : MayBe.of(fn(this .value)); } MayBe.prototype.chain = function (fn ) return this .map(fn).join(); } let joinExample3 = MayBe.of(MayBe.of(5 ));joinExample3.chain((insideMayBe ) => { return insideMayBe.map((value ) => value + 4 ); })
写成ES6格式
1 2 3 4 5 6 7 8 9 10 11 12 13 14 15 16 17 18 19 20 21 22 23 24 25 26 27 28 29 30 31 32 33 const MayBe = function (value ) this .value = value; } MayBe.of = function (value ) return new MayBe(value); } MayBe.prototype.isNoting = function ( return this .value === null || this .value === undefined ; } MayBe.prototype.join = function ( return this .isNoting() ? MayBe.of(null ) : this .value; } MayBe.prototype.map = function (fn ) return this .isNoting() ? MayBe.of(null ) : MayBe.of(fn(this .value)); } MayBe.prototype.chain = function (fn ) return this .map(fn).join(); } let joinExample3 = MayBe.of(MayBe.of(5 ));joinExample3.chain((insideMayBe ) => { return insideMayBe.map((value ) => value + 4 ); })
Monad 其实就是一个含有 chain 方法的函子。只有of 和 map 的 MayBe 是一个函子,含有 chain 的函子是一个 Monad。
什么时候使用Monad?
当一个函数返回一个函子的时候,我们就要想到monad,monad可以帮我们解决函子嵌套的问题。
当我们想要返回一个函数,这个函数返回一个值,这个时候可以调用map 方法
当我们想要去合并一个函数,但是这个函数返回一个函子,这个时候我们要用chain 方法
11.Pointfree与声明式编程 前言 什么是Pointfree风格? 什么是Pointfree风格?中译过来是无参数风格 或者无值风格 ,意即为在编写程序时不关注具体数据以及对象,而只关注的是运算过程,具体的实现是函数的组合。
Point Free: 我们可以把数据处理的过程定义成与数据无关的合成运算,不需要用到代表数据的那个参数,只要把简单的运算步骤合成到一起,在使用这种模式之前我们需要定义一些辅助的基本运算函数。
不需要指明处理的数据
只需要合成运算过程
需要定义一些辅助的基本运算函数
下文将用简单的例子带大家了解Pointfree风格~
11.1 命令式编程的问题
“告诉计算机该怎么做,详细的执行步骤”
考虑以下需求:小A去水果店去买水果,他想知道水果店里有存货并且最贵的水果名称是什么?
1 2 3 4 5 6 const fruits = [ { name : 'Apple' , price : 4 , stock : true }, { name : 'Peach' , price : 14 , stock : true }, { name : 'Grape' , price : 30 , stock : false }, { name : 'Pear' , price : 6 , stock : true }, ];
我们常见的实现方式一般如下:
1 2 3 4 5 6 7 8 9 10 11 12 13 const fruits = [ { name : 'Apple' , price : 4 , stock : true }, { name : 'Peach' , price : 14 , stock : true }, { name : 'Grape' , price : 30 , stock : false }, { name : 'Pear' , price : 6 , stock : true }, ]; const fruitsHaveStock = fruits.filter(fruit =>const sortedDescFruits = fruitsHaveStock.sort((a, b ) => b.price - a.price);const mostExpensiveFruitName = sortedDescFruits[0 ].name;console .log(mostExpensiveFruitName);
这个是很明显的命令式编程,因为大脑会习惯线性的去理解事物,所以我们自然而然的罗列了这个需求的实现步骤,从而实现了上述的需求。但是这样的代码缺点如下:
代码难以复用。
代码自上而下,并没有组织,从阅读上需要完整的从上至下阅读,才能了解发生了什么事。
可以观察到fruits.filter(fruit => fruit.stock);中的fruit参数、fruitsHaveStock、sortedDescFruits这些都是Point,换句话说,我们的程序关注了被操作的数据!
11.2 运用声明式编程和无值风格优化代码
“告诉计算机做什么,我们想要什么”
11.2.1 声明式编程风格 上述代码用声明式的风格重写一下~
1 2 3 4 5 6 7 8 9 10 11 12 13 14 15 16 17 18 19 20 21 22 23 24 25 26 27 28 29 30 31 32 33 34 35 36 37 const fruits = [ { name : 'Apple' , price : 4 , stock : true }, { name : 'Peach' , price : 14 , stock : true }, { name : 'Grape' , price : 30 , stock : false }, { name : 'Pear' , price : 6 , stock : true }, ]; const filter = predicate =>list =>const propEq = (key, value ) => target =>const compose = (...funcs ) => result => .reverse() .reduce((result, fn ) => fn(result), result); const sort = func =>list =>const prop = key =>target =>const head = list =>0 , 1 ).pop();function getHaveStock (list ) return filter(propEq('stock' , true ))(list); } function sortByPriceDesc (list ) return sort((a, b ) => b.price - a.price)(list); } function getName (target ) return prop('name' )(target); } function getMostExpensiveFruitName (list ) return compose( getName, head, sortByPriceDesc, getHaveStock )(list); } console .log(getMostExpensiveFruitName(fruits));
同学们对比Ex 1和Ex 2代码,可以发现两点:
我写了一些通用工具方法filter、propEq、compose等等
最后compose的时候,可以明确知道数据流从 getHaveStock -> sortByPriceDesc -> head -> getName 。而我们不需要了解这些函数的细节实现,从这些函数名称上来看,可以清晰的知道我们要对接收的数据进行的操作!
11.2.2 Pointfree风格,不关注数据! 但是问题来了,细心的同学应该发现了一个问题,虽然说我们改成了声明式编程的风格,但是我们还是关注了要处理的数据本身(也就是值),什么意思?
比如这个函数:
1 2 3 function getHaveStock (list ) return filter(propEq('stock' , true ))(list); }
因为我们只想关心怎么运算操作!list参数对于函数本身实现来说,完全属于多余,且也不需要关注的。
于是我们可以改写如下:
1 const getHaveStock = filter(propEq('stock' , true ));
其余sortByPriceDesc, getName, getMostExpensiveFruitName同理优化。于是就达到了我们说的 Pointfree 啦!(因为我们干掉了point -> list参数)
当然,说不定有些同学发发牢骚了:“代码好像变得更长了…而且还写了一大堆莫名其妙的工具方法,我才不想这么干呢!”
这位同学说的有道理!请继续往下看~
11.3 Ramda
一款实用的,专门为函数式编程风格而设计的JavaScript函数式编程库
如果决心了解JavaScript函数式编程,并且想要用Pointfree风格优化一下代码,那么ramda是值得学习的!它帮我们省掉了上述Ex 2写的大量工具函数。 官网贴上:ramda
所以,我们使用ramda 改写一下~
1 2 3 4 5 6 7 8 9 10 11 12 const { filter, propEq, sort, prop, compose, head } = require ('ramda' );const haveStock = propEq('stock' , true );const getHaveStock = filter(haveStock);const sortByPriceDesc = sort((a, b ) => b.price - a.price);const getName = prop('name' );const getMostExpensiveFruitName = compose( getName, head, sortByPriceDesc, getHaveStock ); console .log(getMostExpensiveFruitName(fruits));
上述代码的优点体现在以下三方面:
代码从可读性上来说提升了
代码可复用性增强了,haveStock、getHaveStock、sortByPriceDesc、getName这些函数并没有关注被处理的数据,而是关注处理本身。
纯函数利于写单元测试
备注:ramda其实可以大致理解为函数式风格的lodash工具库,它和lodash的区别主要在于两点:
Ramda函数本身都是自动柯里化的。
Ramda函数参数的排列顺序更便于柯里化。要操作的数据通常在最后面。(也意味着通常第一个传入的参数是函数方法)。
小结 Pointfree风格的确需要一定的时间才能习惯,但是也不能一概而论把所有函数的参数都移除掉,具体情况还是需要具体分析。Pointfree风格虽然有时候也会造成一些困惑,但的确让代码更加简洁和易于理解了。
当然,如果愿意花点时间去练习和习惯Pointfree风格,相信还是会很值得的。
12.递归 前言:什么是递归
递归和迭代是一枚硬币的两面,在不可变的条件下,递归提供了一种更具表现力、强大且优秀的迭代替代方法
递归函数由以下两个主要部分组成:
递归主要的核心思想是将问题分解为较小的问题,逐个解决后再组合,构建出整个问题的答案。
具体概念不详述,可谷歌百度自行搜索。递归适合解决类似XML解析、语法树构建,深度遍历等问题。
而在Haskell这种纯函数编程语言里,原本是没有循环结构的,递归是天然代替循环的,比如求和函数(当然,Haskell有原生的sum方法支持)实现,如下所示:
1 2 3 sum' :: Num a => [a] -> asum' [] = 0 sum' (x:xs) = x + sum' xs
再看阶乘函数的Haskell实现,如下所示:
1 2 3 factorial :: (Integral a) => a -> a factorial 0 = 1 factorial n = n * factorial (n - 1 )
你会发现函数的声明基本表达了上述所说的递归两个主要部分。不得不承认,很优雅!
递归适当时候可以优雅的解决迭代不适合处理的问题。掌握递归思考的方式是一个长期训练的过程。
下文将带大家学习几个递归的姿势,由于篇幅有限,不详述原理。
(同学们莫慌,下文将用JavaScript举例,毕竟它才是我目前的恰饭工具哈哈)
12.1 求和的几种姿势 考虑给一个数组求和:
1 const nums = [1 , 2 , 3 , 4 , 5 ];
12.1.1 命令式 命令式的开发思维,会很自然写出以下代码:
1 2 3 4 5 6 7 const nums = [1 , 2 , 3 , 4 , 5 ];let total = 0 ;for (let i = 0 ; i < nums.length; i++) { total += nums[i]; } console .log(total);
12.1.2 声明式 更进一步,学了点函数式编程,会写出以下代码:
1 2 3 4 5 const nums = [1 , 2 , 3 , 4 , 5 ];const add = (x, y ) => x + y;const sum = (...nums ) => nums.reduce(add, 0 );console .log(sum(...nums));
12.2 递归 了解递归的同学,写出来以下代码:
1 2 3 4 5 6 7 8 9 10 const nums = [1 , 2 , 3 , 4 , 5 ];function getTotal (sum, num, ...nums ) if (nums.length === 0 ) { return sum + num; } else { return sum + getTotal(num, ...nums); } } console .log(getTotal(...nums));
但是,目之所及,递归还是很少用的,不仅仅常见的缺乏递归思维问题,也是有性能问题的考虑,大家会发现写递归存在栈溢出的问题:
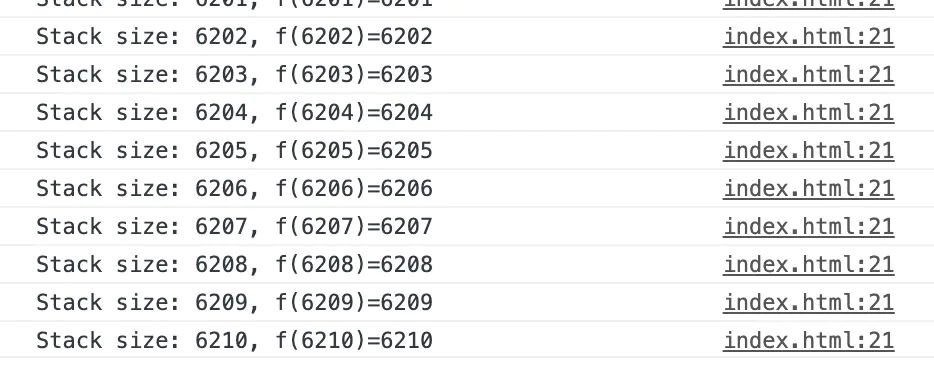
于是我写了个函数,测试一下Chrome浏览器支持递归的深度是多少?
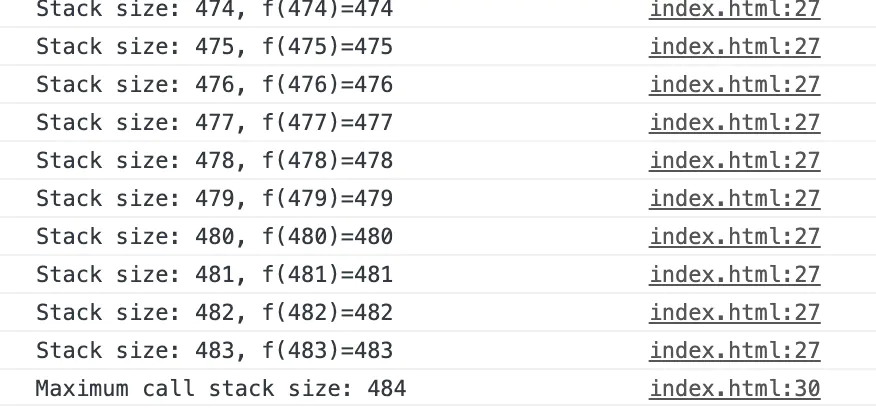
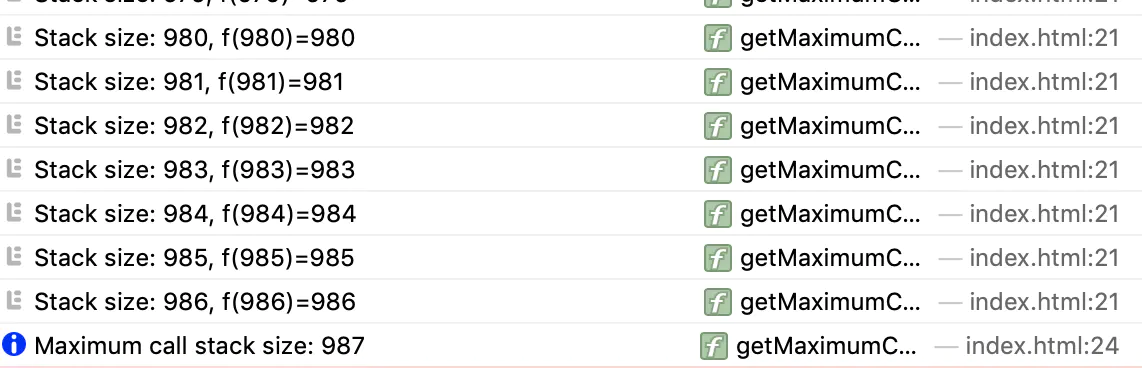
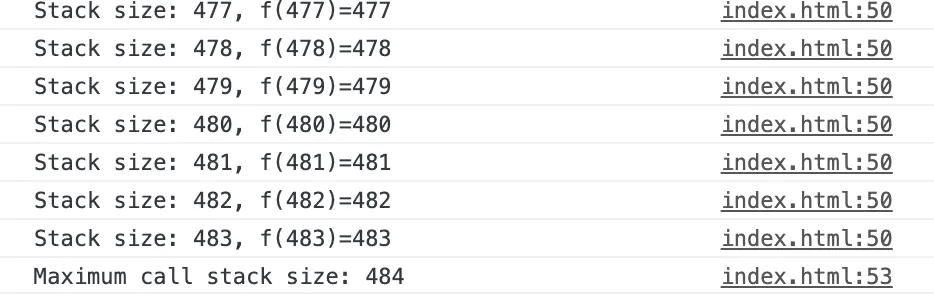
1 2 3 4 5 6 7 8 9 10 11 12 13 14 15 16 17 18 19 20 21 22 23 24 25 26 const nums = [1 , 2 , 3 , 4 , 5 ];function getTotal (sum, num, ...nums ) if (nums.length === 0 ) { return sum + num; } else { return sum + getTotal(num, ...nums); } } function getMaximumCallStack (getTotal ) const f = n =>'1' .repeat(n).split('' ).map(Number )); let i = 1 ; while (true ) { try { const res = f(i); console .log(`Stack size: ${i} , f(${i} )=${res} ` ); i++; } catch (e) { console .info(`Maximum call stack size: ${i} ` ); break ; } } } getMaximumCallStack(getTotal);
测试了上述写的getTotal递归,
Chrome宝宝竟然只是到了484层栈就跪了,实在不敢相信!
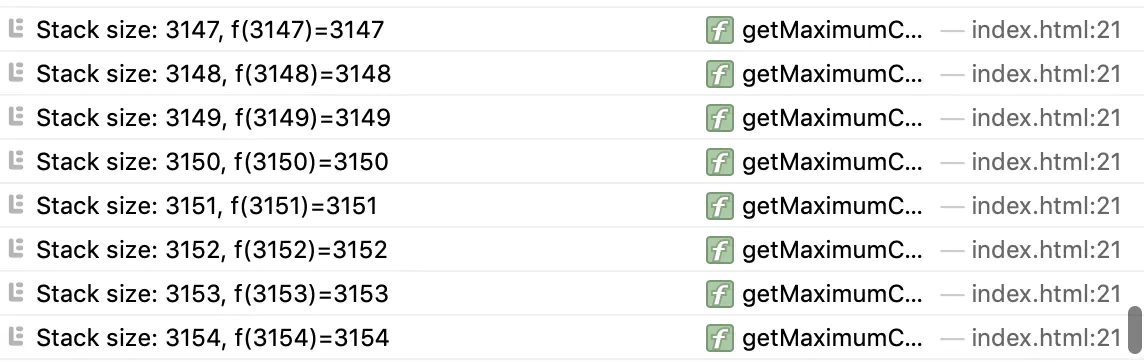
————浏览器三八分割线————
Safari宝宝表现如何呢?
貌似比Chrome好一丢丢,不过也没什么很大的区别…
那这样让我们如何愉快地使用递归呀?
12.3 递归的几种优化方式 如上文所述,递归虽然优雅,但是常常会遇到栈溢出的情况,那么这种问题怎么优化呢?以下三种优化方式:
12.3.1 PTC(Proper Tail Calls 适当的尾调用) ES6的尾调用优化只在严格模式下开启,正常模式是无效的。
适当的尾调用可以避免递归调用时的栈膨胀。不过,为了做到适当的尾调用,我们首先得有一个尾调用 。
那什么是尾调用?
尾调用是执行时不会造成栈膨胀的函数。尾调用是执行return之前要做的最后一个操作,而这个被调用函数的返回值由调用它的函数返回。调用函数不能是生成器函数。
例如
1 2 3 function f (x ) return g(x); }
如果你研究编译器理论,那么可以看看ECMA规范中的正式定义。
PTC一定要运行在严格模式下,文件开始声明"use strict";
1 2 3 4 5 6 7 8 9 10 11 12 const nums = [1 , 2 , 3 , 4 , 5 ];function getTotal_PTC (sum, num, ...nums ) sum += num; if (nums.length === 0 ) { return sum; } else { return getTotal_PTC(sum, ...nums); } } console .log(getTotal_PTC(...nums));
PTC版的递归其实和上文写的递归只有些微写法上的区别:
1 2 3 4 return sum + getTotal(num, ...nums);return getTotal_PTC(sum, ...nums);
这次我们给函数传递了两个参数:一个是我们想要计算剩下的数的和(...nums),一个是累积的和,即sum。
改成PTC写法之后,支持支持PTC优化的浏览器,可以不断重复利用原有的栈,从而避免了栈溢出的问题。(原理大致上是由于浏览器不用保留记住每一次递归中的值,在这个函数里特指 sum + getTotal(num, …nums) 中的sum变量值,从而新栈替换旧栈。
支持PTC优化的浏览器不多,目前可能只有Safari支持,仍然为了眼见为实,在Chrome和Safari两个浏览器进行了测试。
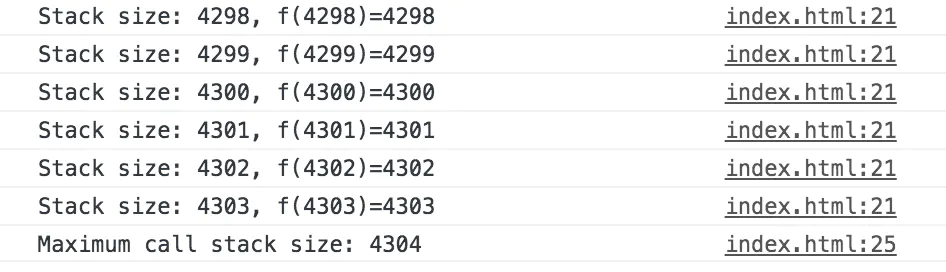
运行上述工具方法测试:getMaximumCallStack(getTotal_PTC)
Chrome宝宝很可惜的偷懒了,木有支持~(残念),见下图:
Safari宝宝果然优秀,对其有所支持!跑了一段时间,未见溢出,见下图:
要记住,适当的尾调用不一定会让代码跑得更快 。实际上,多数情况下,有了它反而会更慢。
然而,使用适当的尾调用除了可以节省调用栈的内存占用,还会由于在局部声明的对象使运行递归函数占用的内存更少。由于下一次递归调用不必使用当前帧中的任何变量,因此垃圾收集器就可以把当前帧中的所有对象销毁了。但在“非尾递归”函数中,每调用一次递归函数,都要分配一次内存。毕竟所有帧在最后一次递归调用(即返回“既定情况”的调用)返回前,都必须保存在帧里。
尾调用的优化请参考JavaScript中的递归、PTC、TCO和STC
12.3.2 CPS(Continuation Passing Style) 在其他语言中,有一个叫做 Thread-local storage 的东西,然而在 Javascript 中,并不存在多线程这种概念(相对而言,Web Worker 等与主进程并不冲突),于是 CLS ,Continuation-local Storage,一个类似于 TLS,得名于函数式编程中的 Continuation-passing style,旨在链式函数调用过程中维护一个持久的数据。
1
2
3
4
5
6
7
8
9
10
11
12
13
14
15
16
17
const nums = [1 , 2 , 3 , 4 , 5 ];const getTotal_CPS = (function ( return function (...nums ) return recur(nums, v => }; function recur ([sum, ...nums], identity ) if (nums.length === 0 ) { return identity(sum); } else { return recur(nums, v => } } })(); console .log(getTotal_CPS(...nums));
这种优化技巧通过创建额外的闭包函数:
将值的计算延迟
避免调用栈的堆积
但是不可避免的消耗了更多的内存用来存放这些多余的闭包函数。 (关于具体原理比较复杂,有空单独写篇文章论述)
Chrome浏览器测试如下图:
仍然栈溢出,但是栈的深度多了很多~
更多CPS相关调用可以阅读:什么是 CLS?在浏览器和 Node.js 中实现 CLS 和Javascript与CLS(Continuation-local Storage)
12.3.3 Trampoline(蹦床函数) Trampoline(蹦床函数)的基本原理是,使用蹦床展平调用,而不是深度嵌套的递归调用。
1 2 3 4 5 6 7 8 9 10 11 12 13 14 15 16 17 18 19 20 21 22 23 24 25 const nums = [1 , 2 , 3 , 4 , 5 ];function getTotal_f (sum, num, ...nums ) sum += num; if (nums.length === 0 ) { return sum; } else { return () => getTotal_f(sum, ...nums); } } function trampoline (f ) return function trampolined (...args ) let result = f(...args); while (typeof result == "function" ) { result = result(); } return result; }; } const getTotal_trampoline = trampoline(getTotal_f);console .log(getTotal_trampoline(...nums));
这种思维技巧将递归巧妙的转换为了迭代! 写法保持了递归的思维,但是经过trampoline工具函数的处理,实际上交给浏览器执行的时候变成了迭代。
Chrome测试如下:
速度飞快!丝滑流畅~
考虑到内存堆栈问题,trampoline还是蛮适合作为折中的方案的。
更多采用Trampoline的了解可以参考前端递归思想(禁止套娃) 和蹦床(trampoline)原理
小结 谨记:递归的目标是写出更具有可读性的代码。所以运用递归时考虑以下两点:
编写迭代循环之前,反思是不是可以用递归更好的表述!
编写递归之前,反思是不是没有必要使用递归?
总结 使用函数式编程最大的好处在于其能提高我们代码的可读性。
编程中有下面这种说法:
你不理解的代码,实际上就是不值得信任的代码。你不信任的代码,实际上就是你不理解的代码。
所谓的理解实际上是指不执行,仅仅读一下,你就能知道某段代码到底要做什么。
已 map 和 for 为例来说: 看到 map 就算我们不去细读其中的代码,也能想到这里想做的是对原始的值进行一定的转换并返回一个新的值; 看到 for,不去进一步的阅读其中的代码,你并不能很快的知晓这段代码要做什么。
当然可读性与对熟练程度也强相关。印象还很深,最初接触 map 时,我并没有马上感觉到它很好,我还是会觉得别扭,但是后来很多情况下就会首选使用 map 。
类似诗词中的语码那样,我们需要熟悉函数式编程中的一些概念,才能更好的理解函数式语句。这种熟悉需要一定的成本,所以在很多人看来,函数式编程和可读性存在下面这张图这样的关系:
一些函数式编程中的概念学习成本不高,而且能极大的提高代码的可读性,比如 map,filter ,所以大部分人在刚刚开始接触函数式编程会觉得其还挺好的,但是比如对reduce,compose,transduce,刚开始接触就会觉得不熟悉,不好理解,也就觉得可读性低。不过觉得不好理解还是不熟悉造成的,多看多联系,你会发现无论是书写还是阅读都变得更为自然起来。
这里我们简单介绍一下 imperative 和 declarative
指令式编程(imperative)关注告诉计算机如何一步步的做某件事情,这也是大多数人习惯的代码风格;
声明式编程(declarative)则关注每一步的输出,函数式编程则从本质上更具声明式特点。
声明式编程比指令式编程要容易理解。计算机擅长指令式,而我们擅长声明式。
如果我们合理的使用了函数式编程,我们的代码主体可能就会变成一个个「独立且拥有合适名称的纯函数」,若干「纯函数的组合」,「集中处理的副作用」。想要了解整体代码逻辑,只需去阅读函数组合在语意上做了什么事情,副作用做了什么,想要了解具体某个纯函数做了什么时,可以单独去查看其定义,而不用去关心其它的函数。
学习函数式编程并不是让自己看起来有多么聪明,也不是为了迷惑队友(哈哈),也不是单纯为了学习而学习。它的实际意义在于,给函数调用穿上语义化的衣服,让实际的应用代码最终更可读友好,利于维护~ 当然与此同时,也会训练自己写出声明式的代码,虽然道阻且长,但总有一天我要学会它们。

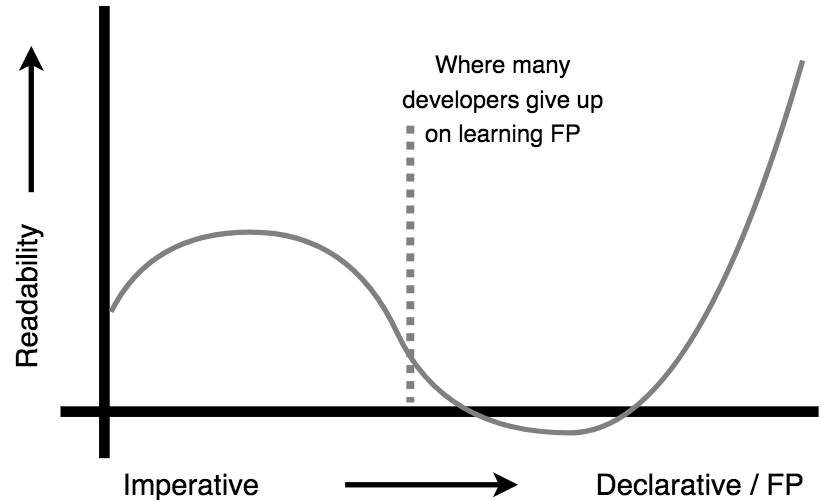 函数式编程与可读性的关系